FAQ / How To
- FAQ / How To
- How to create a vehicle from scratch?
- How to configure the Input parameters
- How to control the vehicle from scripting
- How to create vehicles at runtime
- Arcade cars: quicker turns, minimal sliding
- How to configure a car for drifting
- How to match real-world cars
- Which parameter(s) affect each vehicle aspect?
- How to configure the driver's first person view
- Problem resolution
How to create a vehicle from scratch?
Check out the video:
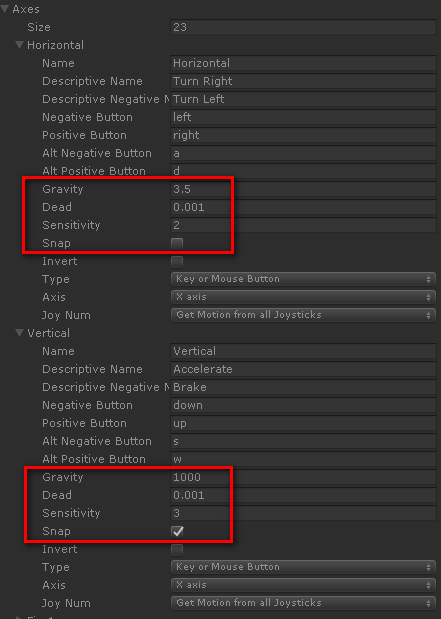
How to configure the Input parameters
I recommend to use these settings for Horizontal and Vertical axes:
How to control the vehicle from scripting
Write a custom input script that gets a reference to the VehicleController component, then modify its input properties as you wish: steerInput, throttleInput, brakeInput and handBrakeInput.
You can check out the scripts VehicleStandardInput.cs and VehicleRandomInput.cs script as examples on how to control the vehicle with custom code.
How to create vehicles at runtime
The order of events for creating vehicles at runtime is:
- Create the root GameObject and disable it (GameObject.SetActive(false))
- Build the hierarchy with child GameObjects and components
- Configure all the components and references. In particular, ensure that the wheels list in the VehicleController component is populated properly.
- Enable the root GameObject (GameObject.SetActive(true))
These properties cannot change while VehicleController is enabled
- Number of elements at VehicleController.wheels
- References to the WheelColliders in the wheel elements
Arcade cars: quicker turns, minimal sliding
These settings at the Vehicle Controller component turn most vehicles into arcade vehicles a'la Mario Kart or Outrun:
- Tire Friction: 3
- Anti-roll: 0.9
- Force Curve Shape: 0.99
How to configure a car for drifting
A prefab Sport Coupe Drift is included. The key settings for configuring the drifting behavior are:
- Center Of Mass position: slightly biased towards front, 0.55 - 0.60
- Large Max Steer Angle: 45 - 50 degrees
- Either rear drive wheels, or all wheel drive balanced 95% rear and 5% front (Drive Balance)
- Large Max Drive Force: around 5x the mass of the car (i.e. 5000 for a 1000 Kg car)
- Large Max Drive Slip: 11 - 13
Max Drive Slip is a key value for configuring more or less drifting. - Handling Bias: slightly oversteer, +5 - 10%
- Traction Control: disabled
- Steering Assist: enabled, 0.6 - 0.8
Steering Assist is a key value for configuring the handling while drifting.
How to match real-world cars
You can configure the vehicles in EVP to resemble the feeling and behavior of actual cars, but not to perform an accurate simulation of a specific car. The parameters in EVP are designed for configuring the vehicle behavior easily and don't have a correspondence with the real world's settings.
A good method is starting with one of the included prefabs. Choose the one that is most similar to the vehicle you want to resemble. Then carefully configure its parameters in order to fine tune the handling and behavior.
If you need to match the specifications of real cars accurately then take a look at Vehicle Physics Pro. VPP is specifically designed to use real-world specifications and simulate the actual behaviors of the cars based on their realistic setup.
Some hints:
- Suspension and height of the center of mass
- Set stiffer suspension, shorter suspension distances, and lower center of mass for sports cars. Softer suspension, larger suspension distances, and higher center of mass for family cars / pickup trucks.
- Engine force and shape
- More Max Drive Force and higher Force Curve Shape for high-acceleration sports cars. Less drive force and lower curve shapes for regular street cars.
- Max Speed Forward, Aerodynamic Drag
- The combination of these define the final top speed on flat road.
- Vehicle Balance
- These settings define how the parameters are balanced among front and rear wheels. They may be used for compensating or enforcing certain behaviors on specific situations (example: move the brake balance to the rear wheels for enforcing over-steer on braking).
- Position of the Center of Mass
- The longitudinal position of the center of mass has great influence on the handling and behavior as well. A good practice is to ensure the suspension to be properly configured according to the weight distribution as for the the CoM position (i.e. stiffer springs where more weight is supported).
Which parameter(s) affect each vehicle aspect?
Most parameters affect each aspect in some way, but here is an useful guide:
- Top speed
-
- Max Speed Forward
- Aerodynamic Drag
- Ground Material's Drag
- Steering
-
- Max Steer Angle
- Steering Limit reduces the angle with the speed
- Steering Assist automatically counter-steers for keeping the control
- Handling Bias tweaks the understeer / oversteer behavior
- Acceleration
-
- Max Drive Force
- Force Curve Shape
- Aerodynamic Drag
- Ground Material's Drag
- Tire Friction transmits up to Max Drive Force to the wheels
- Aided by Traction Control
- Burnouts / Drifting / Powersliding
-
- Max Drive Force
- Max Drive Slip
- Drive Force To Max Slip
- Drive Balance configures the drive wheels
- Tire Friction transmits up to Max Drive Force to the wheels
- Traction Control should be disabled or with small value
- Brake power
-
- Max Brake Force
- Tire Friction (Max Brake Force to the wheels)
- Aided by Brake Assist
- Balanced by Brake Balance
- Brake locks
-
- Max Brake Slip or Max Brake Ratio
- Brake Force To Max Slip
- Brake Balance
- Brake Assist should be disabled or with small value
- Handling
-
- All parameters in "Vehicle Balance"
- All parameters in "Driving Aids"
- Anti-roll
- Max Drive Slip
- Drive Force To Max Slip
- Center of Mass (Position and Height)
- Weight Transfer
-
- Suspension dampers
- Anti-roll
- Height of Center of Mass
- Car stopping distance with no user input applied
-
- Rolling Resistance
- Aerodynamic Drag (very small effect)
- Ground Material's Drag
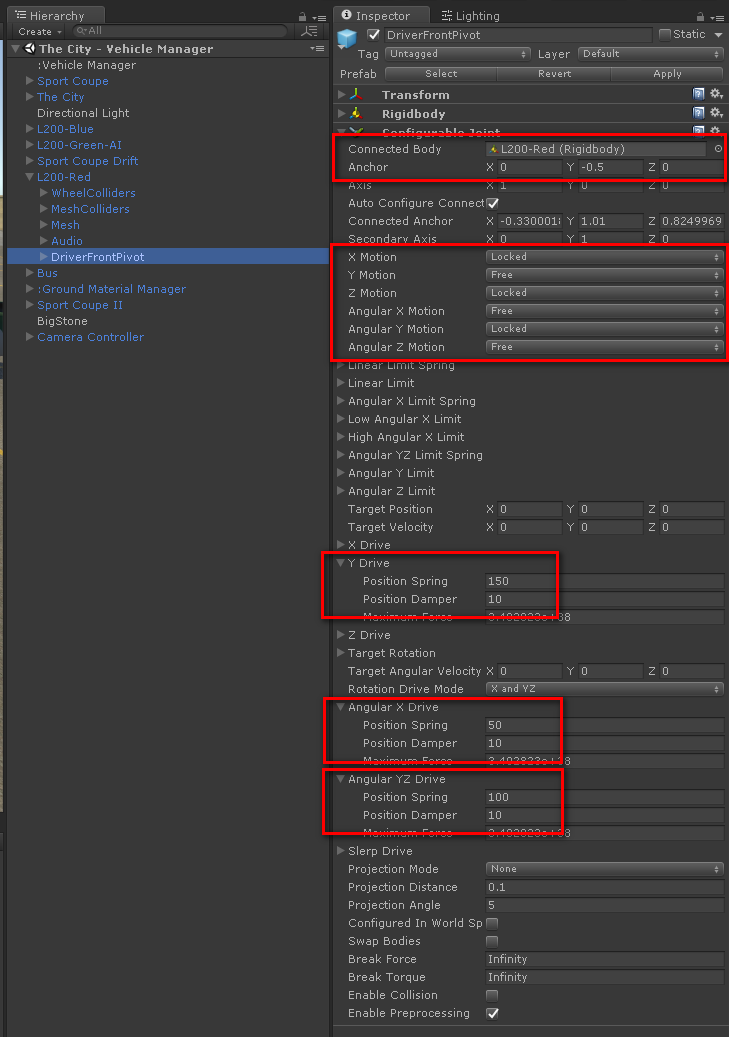
How to configure the driver's first person view
Create a GameObject in the vehicle at the approximate position of the first person view.
Add these components:
- Rigidbody, mass = 0.5
- Configurable Joint, configure the parameters as follows:
Problem resolution
The car jumps uncontrollably or shakes at rest
Watch the damper values at the WheelColliders and/or the mass of the vehicle rigidbody.
Impacts cause a noticeable lag
Remove the colliders from the Deform Colliders list. Deforming the colliders is an expensive operation as the convex hulls are recomputed.
Scaled vehicles don't work correctly
Scaling vehicles can cause unpredictable issues due to how physics are handled in Unity. Thus, scales other than 1 in the Rigidbody and WheelColliders (including their parent GameObjects) are not supported and are indeed strongly discouraged.
You may scale the mesh GameObjects only. As long as the Rigidbody and the WheelColliders receive a final scale of 1, then the vehicles will work as expected. If you scale the meshes, then you should modify the WheelColliders to accommodate the new positions and wheel dimensions (radius, suspension length).